
.png?width=900&height=600&name=nextgen-ehr-optimize-patient-care-osis%20(1).png "nextgen-ehr-optimize-patient-care-osis (1)")
Is your practice clicking or creating a lot of steps when creating orders? How can we make it more user-friendly, streamlined, and efficient? Does your staff know how to configure and setup favorites in the NextGen Electronic Health Record (EHR) Orders Module? If you missed the recent session in the OSIS Webinar Series – Getting the Most Out of The Orders Module, this post discusses how the NextGen Orders Module can be set up more efficiently to reduce provider and staff clicks when ordering and managing tests and results.
What is the NextGen EHR Orders Module?
The Orders Module in NextGen EHR can be used to create and manage lab and radiology orders. Within the module, users can place and send lab and radiology orders, set up order filters for a practice or user, create schedules for future or recurring orders, monitor test results manually or with an interface, send lab results to patient’s portal, and much more.
Making the Orders Module More Efficient
Without configurations, end users spend time clicking or creating more unnecessary steps when an order is completed like:
- Your users may have to deselect the Use NextGen Compendium, especially when they select the performing entity, so they see the proper test codes that match the performing entity.
- They will have to select the Diagnosis.
- The Test Selection may or may not be populated and staff may have to select ‘search all’ and look up each test before selecting the diagnosis, managing tests, and then sending it on to the performing entity.
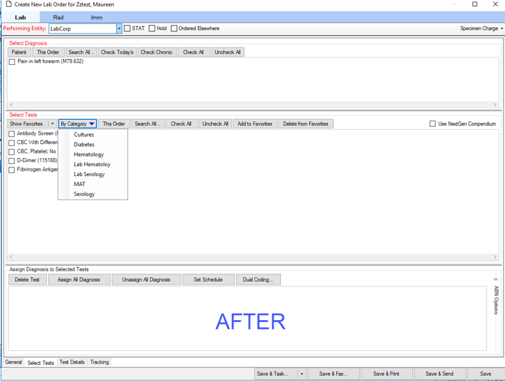
Even if you navigate the module well, this takes time, and taking these steps with multiple orders throughout the day can be a burden. The following example shows the NextGen Orders Module screen before it is specifically configured for users. This is not customized and does not allow a user easy access to the practice favorites for specific orders. So, how can we make the Orders Module more streamlined and efficient? In the next section, we will discuss how an end user can set up Favorites and Categories for their practice to reduce the number of clicks taken for each order throughout the day. 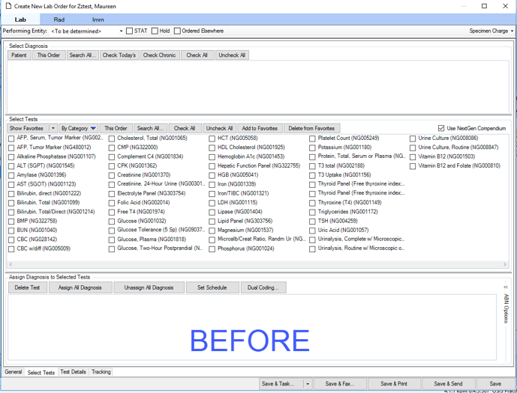
How To’s - Setting Up Test Favorites and Categories
Set up test favorites within the Order Module 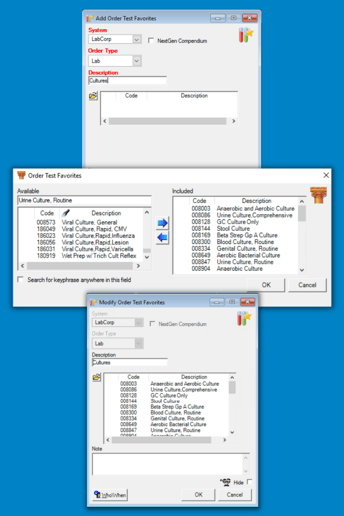
- File Maintenance > Master Files > System > EHR > Order Test Favorites
- Select New
- Complete the required fields:
- System (e.g., Performing Entity- Lab Corp, Quest, InHouse, Radiology)
- Order Type (e.g., Lab or Radiology)
- Description (e.g., Cultures, Serology, X-Ray, CT scan, etc.)
- Select the file folder icon
- Select the lab tests to display under the favorites list
- OK to save and close
▶️Tip - Keep in mind for future maintenance, anytime there is a new test or discontinued test, you will need to come back into the test favorites list and update accordingly for users to find the tests. There will be maintenance throughout to keep them updated.
Now that you have the steps to create order test favorites, we will have to configure a specialty to map the test favorites list to a specialty so the favorites will show up under the category section in the orders module. See steps below to set up Categories.
Set up Categories customized for health centers specialties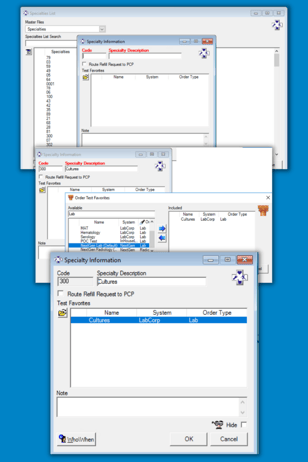
- File Maintenance > Master Files > System > EHR > Specialties
- Create Specialties for the Categories. Specialties are coded by a number
- Select New
- Complete the required fields:
- Code – This is a random number set determined by practice (e.g., 300, 301, 302…)
- Specialty Description (e.g., Cultures, Serology, X-Ray, CT scan, etc.)
- Select the file folder icon
- Select the configure Test Favorite list that corresponds to the Specialty Description (e.g., Cultures = Cultures)
- OK to save and close
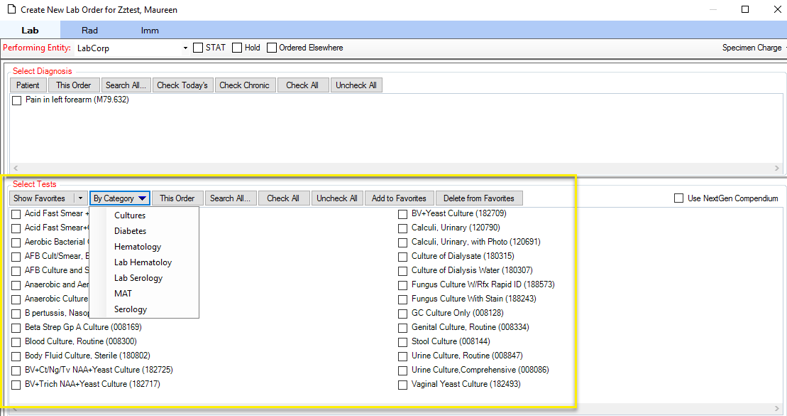
After you have completed the steps above, what does the configuration look like? As seen in the example below, now in the orders module, categories can be selected for easy ordering in the Select Tests section.
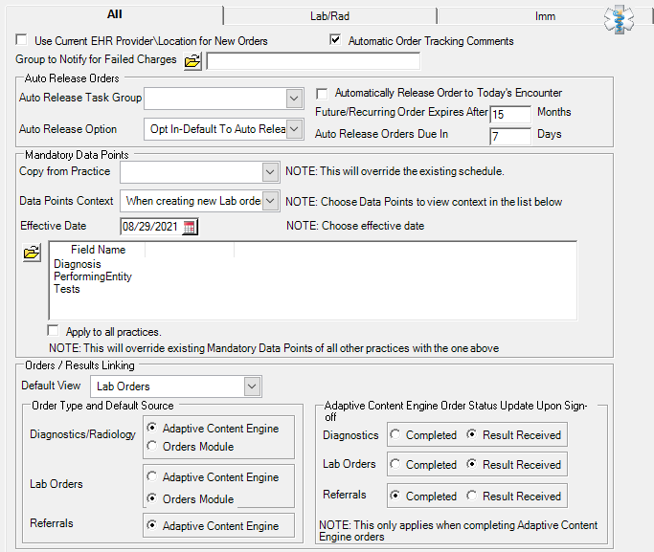
Mandatory Data Points - Aka Required Fields for Practices
Practices may want to enable certain fields to be required before the order is saved and sent to the performing entity to confirm all the information is there to ensure there is not a hold-up to patient care. Below are the steps to enable required fields with an example after selections have been made.
- File Maintenance > Master Files > System > EHR > Practices
- Click on Practice
- Launch
- Select Preferences
- Preference List will display on the left.
- Navigate to orders module and this will display the All tab.
- Look for Mandatory Data Points
- Choose Data Points Context – with six different scenarios to choose from
- When you select a context, choose a workflow for which you are enabling the fields.
- Effective Date
- File Folder to select your fields coincide with the Data Points Context
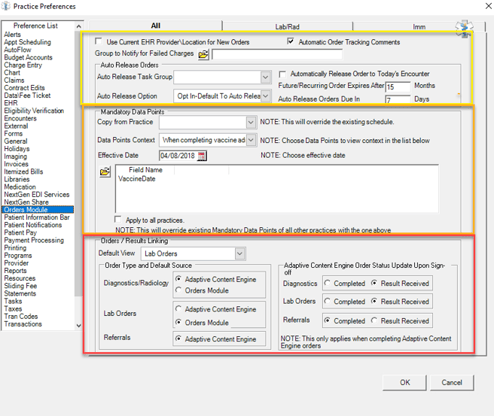
Orders Module Practice Preferences Setup to Help with Efficiency
Within the All Tab and Lab/Rad Tab of Practice Preferences, there are additional fields that can help with a practice's lab ordering efficiencies. Below, we have provided highlights of the preferences for practices to easily reference and make updates to Practice Preferences.
All Tab
- Configure task workgroup to notify of failed charges
- Releasing Future/Recurring Orders
- Auto release order to today’s encounter
- Set expiration dates
- Auto release orders due in XX days
- Mandatory Data Points
- Orders Results Linking
- Configures to defaults order source (ACE or Orders Module) when indexing
- ACE Order Status Update upon sign off
- Results Received vs. Completed
- Closing the Loop
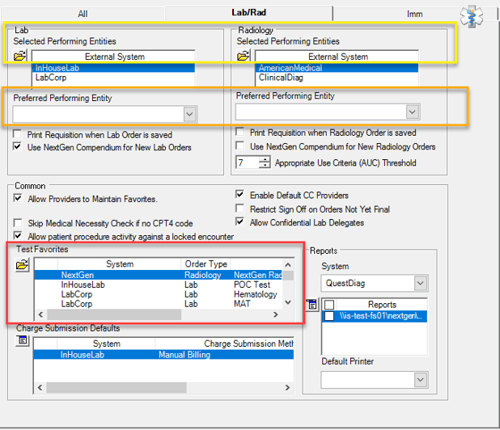
Lab/Rad Tab
- Select Performing Entity- configure the list of performing entities
- Preferred Performing Entity
- Print Requisition when order saved
- NextGen compendium as default for new orders - AUC (Appropriate Use Criteria) Threshold
- Allow Providers to Maintain Favorites
- Allow patient procedure activity against locked encounter (charges)
- Allow Confidential Lab Delegates
- Test Favorites
- Charge Submission Defaults
Your New Customized Configurations
Once users have completed the above steps, the following configurations are now customized. When users access the orders module and choose new, the Use NextGen Compendium is deselected, avoiding selecting each time. The Performing Entity, Select Diagnosis, and Select Tests is set up as a required field to deny any hold up to patient care. Before an order is sent, these three fields need to be selected. The Categories are also set up based on the selections your practice uses daily based on Labs or Radiology orders.
These small time-savers add up throughout the day to help save practices on clicks, keep the ordering workflow streamlined and make ordering more efficient to optimize patient care.