

Get ready to elevate your screening game! After reading this expert advice, you'll soon be configuring your tailor-made tools that fit your specific needs by setting up, customizing, and maximizing the potential of these indispensable health service tools. This isn't just about mundane checkboxes and form-filling; it's about making your job easier and your workflow more efficient.
Your Quick Guide to Screening Tools: Setup, Customization, and Usage
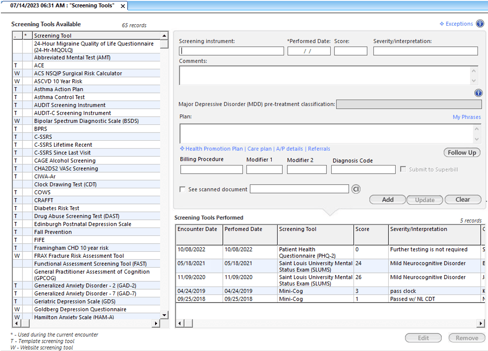 First, let's look at the screening tool template. The screening tools that are supported by NextGen and configured by your practice will be shown in alphabetical order. You'll notice different labels to the left of the screen. Some are blank, some have a 'T', and some have a 'W'. Any with a 'T' indicates that it is a template. If you click on one of the screenings associated with the 'T', a template will launch. If it's a 'W', it will launch a webpage. If it's blank, that's an indicator that it could be a screening tool currently being done on paper or maybe even verbally in the clinic.
In the middle of the screen, if you see an asterisk, that just indicates that a screening tool was done during the visit. If a screening is linked to a template, the system will automatically populate the screening tool, performance date, score, and interpretation based on the template. This information will then be added to the grid, streamlining the process and saving you time. If it is a web-based screening tool or one that is blank, it allows you to fill in a score and interpretation, but it will automatically log the date and the screening instrument.
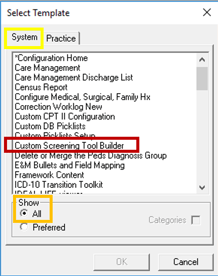 Now, let's move on to configuring the screening tools. This is where you can customize what appears on the screening tools template. To access the configuration template, go to File System Practice, select the practice tab, and click the all radio button. Ensure the top has the Screening Tools Log selected, then click Add to update it. Once in the configuration template, you can add, start, and stop ages, and genders, indicate your score, and field type, and even associate a LOINC code. This is where you can make the screening tool your own, tailored to the specific needs of your practice.
Finally, let's talk about the custom screening tool builder. This is a new feature that allows you to create your screening tools. You can name the tool, determine the interpretation, and add the screening tool name to the grid. You can create questions, determine if they should be required, and create answers. The answers can be a simple yes or no, free text, or you can create a pick list to choose from.
First things first, you need to add your screening tool. Don't worry, there's no limit to how many you can add. However, keep in mind that these tools can't pull in any information from the patient's chart. They're designed to be simple, question-and-response type screenings or surveys. So, if you're looking to create a complex, multi-faceted tool, this might not be the solution for you. But if you're after a straightforward, easy-to-use screening tool, you're in the right place.
Once you've added your screening tool, it's time to add your questions. For example, you might ask, "During the past 12 months, have you found it difficult to purchase food?" or "During the past 12 months, have you had to go without food for a day or more?" You can add as many questions as you need, and you can even make them required.
Next, you'll need to add your answer options. If your questions are simple yes/no queries, you can easily add these options. If you want to add a free text option, that's also possible. Or, if you need to create a pick list, you can simply type the answers. For example, for the question about finding it difficult to purchase food, your answers might be "Very difficult," "Somewhat difficult," and "Not difficult."
Now that you've got your screening tool set up, you might be wondering how to get it into your screening tools template. This is where the general configuration comes in. You'll need to go to File System Practice Template, click the Practice tab, and locate the template called Data Set Setup. From there, you can configure any of your screening tools.
Finally, you can add your screening tool to your patient history. This will allow you to easily access it during patient visits and keep track of the responses. And there you have it! You've just created a custom screening tool that's tailored to your specific needs.
The journey to creating a powerful health services screening tool is more accessible than it may seem. With the right support and resources, you have the potential to develop a tool perfectly tailored to meet the needs of your practice. For an in-depth exploration of screening tools, watch our on-demand webinar, where Miranda, our NextGen EHR SME, guides you through the process with comprehensive insights. If you have further questions on screening tools, contact us today!